Better isolate management with Isolate.run()
Dart 2.19 introduces a new function that makes implementing concurrency as simple as a single line of code.

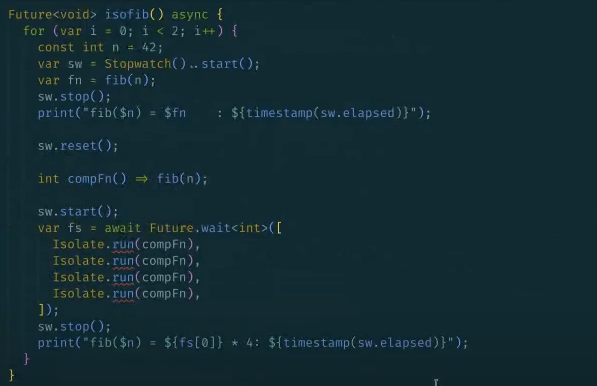
All Dart code runs in isolates. Whether you implement
multiple isolates to enable
concurrency
in your Dart programs is up to you. How you can
implement multiple isolates is up to us on the Dart team,
and in Dart 2.19, we’ve made a huge upgrade to the process
that we’re excited to share. Meet
Isolate.run()!
run() takes all of the complexity of setting up
and managing isolates and completely abstracts it into a
single function call. It’s been possible to use isolates
with a handful of primitives for a while now. But, even with
all
the recent performance improvements
for isolates, the process was at best, tedious, and at
worst, error-prone.
To appreciate how much of an improvement
run() is, this article breaks down the previous
method of building out the functionality piece-by-piece from
low-level primitives. Then, we’ll contrast that to using
Isolate.run(), and show you how it works on the
inside. Even if you’ve never used isolates before, we’re
sure that run() will get you excited to try
them out!
Isolates
#
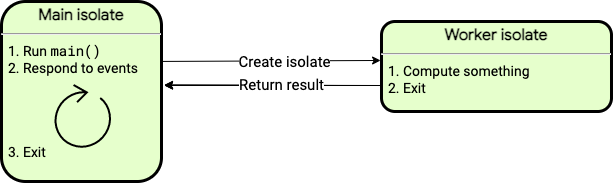
Isolates are a fairly straightforward concept. An
isolate
is essentially a single thread of execution in Dart. They
let you execute parts of your code in parallel. You can
start new parallel executions (as many as you want) and tell
them what to do, right from
main (the main thread, or
main isolate). Isolates don’t share memory; instead, they pass messages
back and forth to communicate. So, you don’t have to worry
about typical multithreading problems, like race conditions,
or mutexes and locks.
Sounds great! But how do you use them? Before
Isolate.run(), that’s where things became
tricky.
The isolate API is made up of low-level primitives that provide a wide range of functionality. Granularity like that is great when you need to customize your isolates’ functionality. Granularity is not so great, though, when it’s necessary to use isolates at all. Especially since almost all of the use cases for isolates require the same basic configurations for setup and management. This basically meant exposing every implementation detail for you, Dart’s users, to handle yourselves.
Let’s take a look at a typical isolate setup to better
understand the tedious process that
Isolate.run()
solves.
Using Isolates (before)
#
You can think of
Isolate.spawn()
as the old starting point for isolates. Flutter’s compute
function was built off of spawn(). It takes a
method to invoke as its entrypoint argument,
plus any arguments for that method, and other configurations
for the isolate itself. In the past, this
entrypoint could only be a top-level or static
method.
Isolate.spawn(_readAndParseJson, filename);
Isolate created, all done! Just kidding. Not even close.
Calling spawn won’t return anything to actually
work with. It only returns an isolate object, which simply
confirms the isolate has started.
The main isolate and the spawned isolate (the isolate
created by spawn()) can’t communicate directly,
beyond the initial arguments passed on creation.
Realistically, even if you don’t need any computation
results back from the spawned isolate, you would still want
some kind of verification that the computation succeeded, so
you’re always going to want a message back.
To enable communication, you have to set up ports. You
create a ReceivePort object before calling
spawn. The sendPort member of the
ReceivePort object goes to the spawned isolate
as another argument for spawn.
void main() async {
 final resultPort = ReceivePort();
 final jsonData = await Isolate.spawn(_readAndParseJson, [resultPort.sendPort, filename]);
}
This means the function you pass to spawn has
to be specifically configured to do something with
that sendPort. In other words, you can’t just
reuse existing functions with isolates. So instead of
passing spawn a regular function that just
reads and parses a JSON file, you would create something
like:
Future<void> _readAndParseJson(List<dynamic> args) async {
SendPort responsePort = args[0];
String fileName = args[1];
final fileData = await File(filename).readAsString();
final result = jsonDecode(fileData);
// ...
}
Your special, isolate-friendly, JSON-decoding function can
simply “return result” and you’re all done,
right? Not quite. The result needs to be sent through
responsePort. That’s how isolates communicate
with ports. You can use another primitive,
Isolate.exit()
to return the result efficiently and close the spawned
isolate at the same time:
Isolate.exit(responsePort, result);
The exit() function transfers the
memory that holds the message in the spawned isolate to the
main isolate (as opposed to copying it over) and safely
closes the isolate.
Let’s string this all together. Since result in
this example is parsed JSON , you’d probably want to
destructure it a little to actually use it. For the sake of
clean code, instead of planting those three lines that
create the receivePort and the isolate, and
await their response, right into main(), we
should put them in their own function.
void main() async {
final jsonData = await _spawnAndReceive(filename);
print('Received JSON with ${jsonData.length} keys');
}
// Spawns an isolate and waits for the first message
Future<Map<String, dynamic>> _spawnAndReceive(String filename) async {
final resultPort = ReceivePort();
await Isolate.spawn(_readAndParseJson, [resultPort.sendPort, filename]);
return (await resultPort.first) as Map<String, dynamic>;
}
// The entrypoint that runs on the spawned isolate.
void _readAndParseJson(List<dynamic> args) async {
SendPort responsePort = args[0];
String fileName = args[1];
final fileData = await File(filename).readAsString();
final result = jsonDecode(fileData) as Map<String, dynamic>;
Isolate.exit(responsePort, result);
}
What’s being accomplished is relatively straightforward. It’s the exposure of implementation details that makes it feel complicated, like ports for message passing, and needing a dedicated function for dealing with ports that’s otherwise isolate-agnostic.
Error handling
#The example so far still isn’t really a “complete”, production-ready implementation. You’d be doing yourself a disservice to leave out any kind of error handling, but it’s commonly forgotten as an additional step in an already substantial process. Without any error handling, if an uncaught async error were to crash your isolate, for example, you wouldn’t know what happened to cause the error, or even be alerted that anything had happened at all.
Covering every error handling possibility for isolates would be extensive, but in general it would involve a few more additions to the code.
You could, as a minimum, add the
errorsAreFatal, onExit, and
onError
parameters to the spawn call:
  await Isolate.spawn(_readAndParseJson, [resultPort.sendPort, filename],
          onError: resultPort.sendPort,
          onExit: resultPort.sendPort,
          errorsAreFatal: true
  );
This ensures that resultPort receives a message
even if the spawned isolate terminates without sending a
result, or if it has any uncaught errors. Making errors
fatal means uncaught errors exit the isolate as a safety
precaution, to ensure it terminates at all.
The onExit argument makes the isolate send
null to the port upon exiting. The
onError argument makes an uncaught error send a
list of two strings to the port (the toString
of both the error and stack trace).
Reusing the result port lets you avoid creating more ports,
so you only have to look for messages in one place. But it
also means you need to distinguish the
onExit and onError messages from
the result value. Here, we assume that the JSON must be a
Map, so it cannot be a list or
null. Otherwise you’d also have to wrap the
result in something recognizable. You would have to create a
(trivial) message protocol on top of the port messages.
Beyond that minimum, you could then check
response for specific errors. One such case
would be checking if resultPort is
null, meaning the isolate terminated without
sending results:
  final response = await resultPort.first;
  if (response == null) {
    // Isolate exited. Throw some error, for example:
    throw RemoteError("Isolate terminated without result");
  }
Another would be checking if the result is a list, meaning an uncaught error occurred:
  if (response is List<dynamic>) {
    // Uncaught error, list of two strings.
    var remoteError = RemoteError(response[0], response[1]);
    await Future.error(remoteError); // Rethrow.
  }
Then, finally, handle an actual result:
// Otherwise it's a result value, which is a map.
return message as Map<String, dynamic>;
In any case, you’d want to put spawn in a
try block to check if sending the
entrypoint to the new isolate failed. If it
did, the result port won’t get any message, and needs to be
closed:
  try {
    await Isolate.spawn( ... );
  } on Object {
    resultPort.close();
    rethrow;
  }
Providing a bare minimum of error handling ensures that the
result port is always closed, and
_spawnAndReceive always completes, no matter
how the spawned isolate exits. You could also make things
nicer, for example, by catching and sending errors
and stack traces back as actual objects, not just strings
like the onError handler.
Error handling obviously introduces a lot of variation, and with it the mental overhead of deciding how to approach it and what to factor for. It’s understandable that it’s commonly left out of primitive isolate setup.
Using Isolates (after)
#
Isolate.run() sets up all parts of isolate
implementation with the primitives you previously had to use
yourself, in a single function call:
void main() async {
  final jsonData = await Isolate.run(_readAndParseJson);
  print('Received JSON with ${jsonData.length} keys');
}
No ports, no separate spawning, exiting, or error handling,
and no special return structure. Perhaps the best part, the
entrypoint you pass to run can be
any existing function:
Future<Map<String, dynamic>> _readAndParseJson() async {
  final fileData = await File(filename).readAsString();
  return jsonDecode(fileData);
}
This example shows an asynchronous function, but
run could just as easily execute a
synchronous function. The run function
itself always returns asynchronously, which is all that
matters.
The entrypoint can also be a
function expression, written directly inline
wherever you call run. Isolates, and any
higher-level APIs written on top, are no longer limited to
running only static or top-level functions.
  final jsonData = await Isolate.run(() async {
    final fileData = await File(filename).readAsString();
    final jsonData = jsonDecode(fileData) as Map<String, dynamic>;
    return jsonData;
  });
The additional message parameter is no longer necessary, and you can avoid packing and unpacking arguments in data structures like lists.
You don’t have to think much about error handling at all.
The run function combines local and remote
error capturing, handling and cross-isolate communication,
and exposes the result as a single normal (asynchronous)
error that you can catch in a standard
try/catch. You can forget
isolates, and treat it as a normal function.
  try {
    await Isolate.run(_readAndParseJson);
  } on FormatException catch (e, s) {
    print(e.message);
  }
Isolate.run() enables much cleaner and
ergonomic code. Flutter’s compute function even
switched over to using run instead of
spawn!
Inside Isolate.run()
#
Take a look at the [implementation of
run](https://api.dart.dev/dev/3.0.0-125.0.dev/dart-isolate/Isolate/run.html#implementation:~:text=isolate%20for%20debugging.-,Implementation,-%40Since(%222.19)
itself. It digs into all the low-level isolate-related APIs
(which would’ve been your job to implement before) to
construct a “perfect”, comprehensive isolate setup. It takes
the method to execute, computation, and sets up
all the ports and their returns to account for efficient
message passing between isolates.
static Future<R> run<R>(FutureOr<R> computation(), {String? debugName}) {
    var result = Completer<R>();
    var resultPort = RawReceivePort();
    // ...
    result.complete;    // or result.completeError for error handling blocks
    // ...
There’s thorough error handling for every potential
case. The run function checks whether an
isolate dies before it’s done computing. If the computation
throws, the isolate terminates and throws the same error to
the main isolate.
// ...
    resultPort.handler = (response) {
      resultPort.close();
      if (response == null) {
        // onExit handler message, isolate terminated without sending result.
        result.completeError(
            RemoteError("Computation ended without result", ""),
            StackTrace.empty);
        return;
      }
// ...
If an uncaught asynchronous error occurs, the isolate terminates and reports the error asynchronously to the main isolate. If the main isolate terminates first, the spawned isolate terminates and treats the situation as an uncaught async error.
// ...
void _run() async {
    R result;
    try {
      var potentiallyAsyncResult = computation();
      if (potentiallyAsyncResult is Future<R>) {
        result = await potentiallyAsyncResult;
      } else {
        result = potentiallyAsyncResult;
      }
    } catch (e, s) {
      // If sending fails, the error becomes an uncaught error.
      Isolate.exit(resultPort, _list2(e, s));
    }
    Isolate.exit(resultPort, _list1(result));
  }
Lastly, run always uses exit to
safely shut down. That means data is efficiently transferred
from isolate to isolate without actually copying it.
Summary
#
The run function is ideal for starting one
computation and waiting for the results. The primitives are
still there if you want to build out your own isolate setup
for something that run doesn’t cover, like a
long-running isolate
that can send and receive messages multiple times. For most
cases though, replacing spawn and all its
supporting configurations with a single
run statement should be used over any other
configuration.
If you’d never tried isolate management before
run, it would be hard to believe all this
functionality previously had to be implemented by the user!
Isolate.run() — available in Dart 2.19 and
Flutter 3.7 — makes code so much more ergonomic, and makes
isolates so much easier to use. What will you do with all
the time run saves you?
More from Dart

History of JS interop in Dart
Support for Wasm just landed in the current Flutter beta, thanks to an exciting JavaScript interop milestone reached in Dart 3.3. To…

Dart DevTools: Analyzing application performance with the CPU Profiler
Whether you’re a backend developer writing a command line tool using Dart, or a UX engineer building applications with Flutter, program performance is critical to the success of your project. Command line tools should minimize latency and apps should be responsive and snappy with no dropped frames. As developers, we try our best to write performant code but sometimes it’s not clear why our code isn’t performing as well as we would expect.